Connecting to your vehicle
Once you have downloaded xDelete on your Android or iOS device and have acquired the additional hardware needed, you are ready to connect to your vehicle. xDelete requires the correct Adapter to be used for your Device AND your vehicle. This chapter explains the possible combinations. For a graphical overview, please look HERE.
Preparing device
Make sure your device has at least 25% battery capacity left.
Set your device to Flight Mode. Bluetooth and 4G/Cellular must be turned off. Especially true when flashing through Wi-Fi connection. (more stable connection)
Cable-Connection: Be sure to grant xDelete the rights needed to access the local USB/Lightningport on your device.
Once a flash has started, leave your device alone. Do not move or touch it.
Preparing vehicle
Make sure not to open/close doors during the process. If you want to stay outside during the process, open the side window and operate your device standing next to the vehicle.
Ignition has to be turned ON, Engine OFF.
Make sure your transmission is in “P” position.
Turn off ALL auxiliary devices: Headlights, Interior Lights, Heating, Heated Seats, Radio, NavScreen etc.
Lock your Drivers-Seatbelt before starting the flash! Do not release the seatbelt, unless the process is completed! (this keeps the Ignition ON)
Set your device to Flight mode. (only Wi-Fi ON) Incoming calls through Bluetooth will disturb not only the Android device, but your car to.
Make sure you’re only flashing with a good, healthy battery. xDelete will refuse to start a flash operation below a certain voltage level.
The car can draw up to 30 Amps during the flash, so we recommend a power supply able to deliver at least 30 Amp @ 13,8V. (e.g. Maas SPS-30). The voltage supply needs to be connected to the terminals in the engine bay. DO NOT connect directly at the vehicle’s battery. A normal battery tender or charger does not help to stabilize the voltage during the process. It can only help to pre-charge the battery in advance.
The very first flash on your vehicle will “Install” xDelete on your car. This procedure takes approx. 5 min with DCAN. We do recommend using a power supply for the first flash. After installing, the following flashes will take no more than approximately 2 minutes. These flashes can be carried out without a charger, but you do not want to see voltage levels below 12V when starting a flash. It is NOT possible to flash any ECU in car while the engine is running.
Any aftermarket device connected to CAN-Bus (like a JB4) needs to be disconnected/turned OFF prior flashing any ECU on your car. Examples of units potentially causing issues for every flash operation:
throttle pedal tuning boxes
any performance displays (like Awron)
sport-exhaust with sound control installed in the car
aftermarket Android Headunits
aftermarket CarPlay Units
aftermarket HUD (head-up displays)
aftermarket immobilizers
Mileage manipulation devices
Connecting through DCAN Cable (E-Series ONLY)
ANDROID E-SERIES ONLY
This section only applies to E-Series cars. DCAN cables can only be used in combination with Android devices and E-Series cars.
Plug in your cable to the OBD port of your vehicle. The OBD port is located in the drivers footwell on the left side.
Connect the OBD/DCAN cable with your USB OTG Adapter and Android device
Unlock your device and wait for the USB permission screen to pop up. Please make sure that you’re granting permanent access rights to xDelete in this screen. On some Android versions, the screen will only appear after startup of xDelete. Wait a few seconds after connecting the USB OTG cable.
Start xDelete and press the Car-Symbol in the upper right corner.
If the vehicle is connected for the first time xDelete will automatically save its data to your device. You can now redeem your voucher code. (Active Internet required)
After redeeming your voucher code, you can proceed to select your desired xDrive Setting and click on “Flash”.
During the flash fault messages will appear in-car. That is perfectly normal. Those will be cleared after the flash is done.
If you are still left with some fault codes after the flash, you can trigger the fault code deletion again, by pressing the three white dots in the upper right corner of the app. Please note, that some faults can only be deleted, after the car went to full sleep. (Ignition turned OFF and car locked for at least 20 seconds)
Some fault codes may require the vehicle to be driven for some time, before they disappear by themself. (for example cars with Active Body Control)
Connecting via THOR or Orange MHD Wi-Fi Adapter (E-Series ONLY)
ANDROID IOS E-SERIES ONLY
This section only applies to the orange MHD Wifi Adapter and/or Thor Wifi Adapter in combination with E-Series vehicles. For F-Series vehicles, please look to the ENET Sections below.
Most Android devices will prefer Wi-Fi connections over 4G/LTE. As soon as you connect to the Wi-Fi network created by the THOR or MHD Wi-Fi Adapter, you will no longer be able to access the internet, even if cellular is still turned on. Therefore, the initial vehicle unlock requires a special procedure when using the THOR or orange MHD Wi-Fi Adapter:
First startup of xDelete: Start with Internet, so not connected to the wireless Adapter Wi-Fi. This is only true for the very first startup. Not needed afterwards.
Plug in your Wi-Fi Adapter into the OBD port and wait 10-20 seconds. Connect to the created Wi-Fi on your device.
Start xDelete and press the Car-Symbol in the upper right corner. If the vehicle is connected for the first time xDelete will automatically save its data to your device.
After the vehicle is saved you need an active internet connection to redeem a License. Please disconnect from Thor/MHD WIFI before redeeming and connect again afterwards.
After redeeming your voucher code, you can proceed to select your desired xDrive Setting and
click on “Flash”.
During the flash fault messages will appear in-car. That is perfectly normal. Those will be
cleared after the flash is done.
If you are still left with some fault codes after the flash, you can trigger the fault code deletion
again, by pressing the three white dots in the upper right corner of the app. Please note, that some faults can only be deleted, after the car went to full sleep. (Ignition turned OFF and car locked for at least 20 seconds)
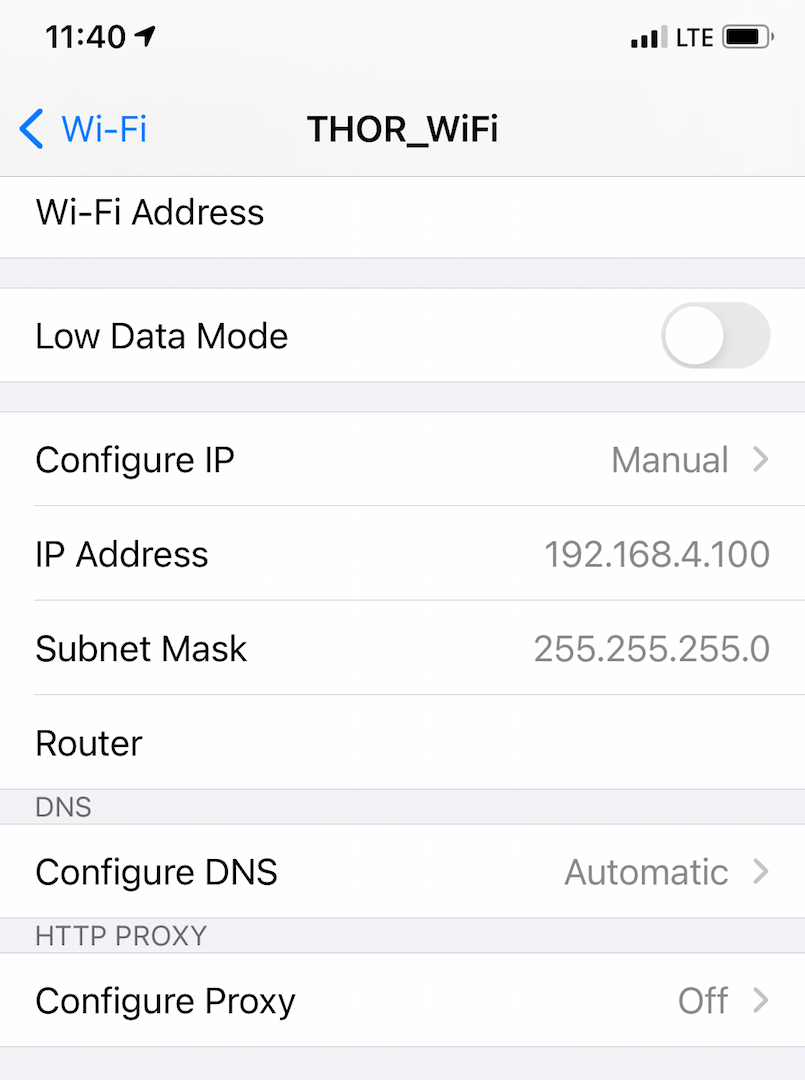
Hint: on iOS devices you can set the Wi-Fi to be still connected to the internet, even if you are connected to the Wi-Fi adapter .
IOS ONLY
Go to WiFi settings and select the WiFi adapter network. Open Network settings and change options as follows:
Click: “Configure IP” - Manual
IP Address: 192.168.4.100
Subnet Mask: 255.255.255.0
Router: Leave field empty
Click “save”
5 or 6-Series E6x Vehicles with Active Body Control may need to be driven for some time, until ABC-related fault codes clear.
Connecting with ENET cable (F-Series only)
ANDROID IOS F-SERIES ONLY
Android users need to configure the Ethernet port, after connecting the ENET Adapter to their devices. Please open the settings panel on your device. Depending on your Android version, the procedure may be a bit different. The screens were taken from a Galaxy S9 phone, running Android 9. This procedure is only necessary on first connect. Your phone will store those settings for subsequent connects. Eventually you need to re-plug the adapter, after saving the settings to take effect.
Only Android devices which are able to set a static IP are able to use ENET cable connection. If your Android does not offer this option, you cannot connect through ENET cable. Use a Black MHD WiFi adapter instead. (this one has built in DHCP Server)
ANDROID ONLY
Connect the cable & press OK
… open Connections, …
… more connection settings”…
… then “Configure” …
… open “Ethernet”…
… and set the settings as shown below
Very first start: Start with Internet, so not connected to the wired Adapter. This is only true for the very first startup of xDelete. Not needed afterwards.
Plug in your ENET-connector into the OBD port and wait 10-20 seconds. The OBD port is located in the drivers footwell on the left side. Please make sure that you’re granting permanent access rights to xDelete when the app first starts. On some Android versions, the screen will only appear after startup of xDelete.
If the vehicle is connected for the first time xDelete will automatically save its data to your
device.
After the vehicle is saved you need an active internet connection to redeem a License. Please disconnet the ENET cable before redeeming and connect again afterwards.
Proceed to select your desired xDrive Setting and click on “Flash”.
During the flash fault messages will appear in-car. That is perfectly normal. Those will be
cleared after the flash is done.
If you are still left with some fault codes after the flash, you can trigger the fault code deletion
again, by pressing the three white dots in the upper right corner of the app. Please note, that some faults can only be deleted, after the car went to full sleep. (Ignition turned OFF and car locked for at least 20 seconds).
Connecting with Black MHD ENET Wi-Fi adapter (F-Series only)
ANDROID IOS F-SERIES ONLY
Plug in the adapter into your OBD port and connect to the created Wi-Fi named “MHD_xxxx” with the password “MHD_ENET”. No further configuration needed. The Adapter works on Apple and Android devices. ENET is only available on F-Series vehicles. There is no support for E-Series cars with this adapter.
Most Android devices will prefer Wi-Fi connections over 4G/LTE. As soon as you connect to the Wi-Fi network created by the MHD ENET-Wi-Fi Adapter, you will no longer be able to access the internet, even if cellular is still turned on. Therefore, the initial vehicle unlock requires a special procedure when using the black MHD Wi-Fi Adapter:
Very first start: Start with Internet, so not connected to the wireless Adapter Wi-Fi. This is only true for the very first startup of xDelete. Not needed afterwards.
Plug in your Wi-Fi Adapter into the OBD port and wait 10-20 seconds. Connect to the created Wi-Fi on your device. Start xDelete and press the Car-Symbol in the upper right corner.
If the vehicle is connected for the first time, xDelete will perform the Online Support-Check and automatically save its data to your device.
After the vehicle is saved you need an active internet connection to redeem a License. Please switch to your local Wi-Fi or 4G connection now and return to MHD Wi-Fi afterwards!
After redeeming your voucher code, you can proceed to select your desired xDrive Setting and
click on “Flash”.
During the flash fault messages will appear in car. That is perfectly normal. Those will be
cleared after the flash is done.
If you are still left with some fault codes after the flash, you can trigger the fault code deletion
again, by pressing the three white dots in the upper right corner of the app. Please note, that some faults can only be deleted, after the car went to full sleep. (Ignition turned OFF and car locked for at least 20 seconds)
Some faults may require the vehicle to be driven for some time, before they disappear by itself. (for example, cars with Active Body Control)
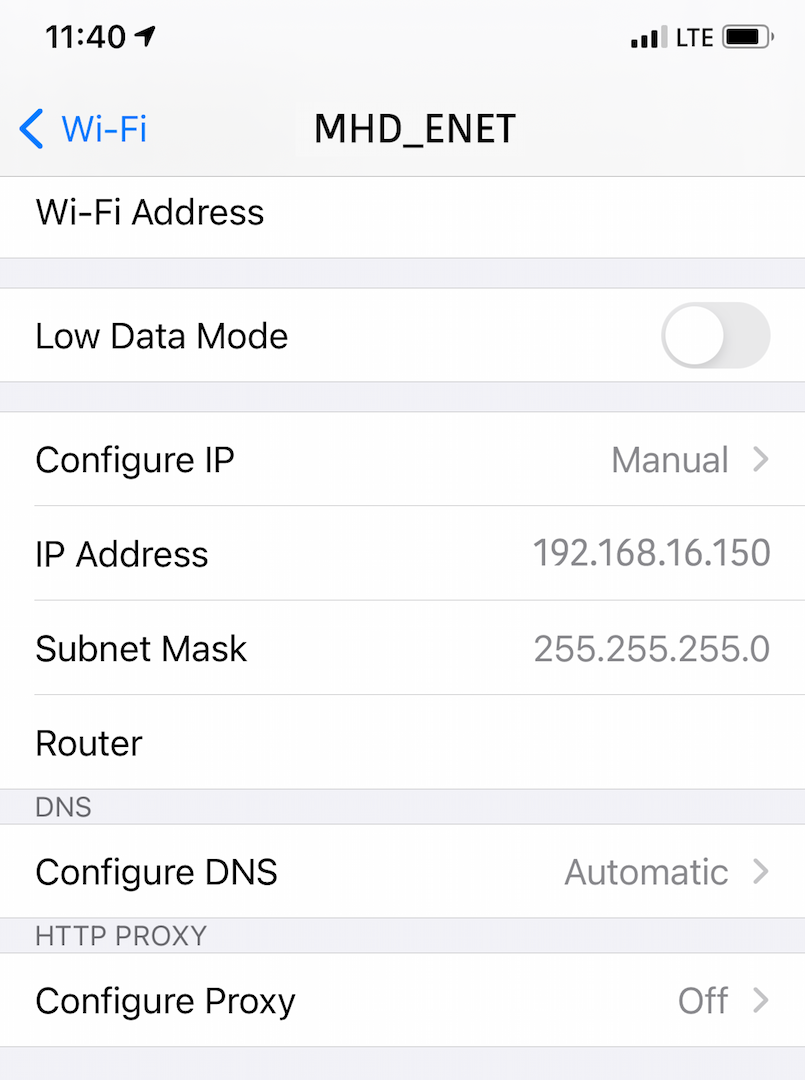
Hint: on iOS devices you can set the Wi-Fi to be still connected to the internet, even if you are connected to the Wi-Fi adapter .
IOS ONLY
Go to WiFi settings and choose the WiFi adapter, then go into the settings, and change the settings to the ones seen on the right:
Click: “Configure IP” - Manual
IP Address: 192.168.16.150
Subnet Mask: 255.255.255.0
Router: Leave field empty
Click “save”
Back to the Overview Page.