| Table of Contents |
|---|
 Customization Module
 | Table of Contents |
|---|
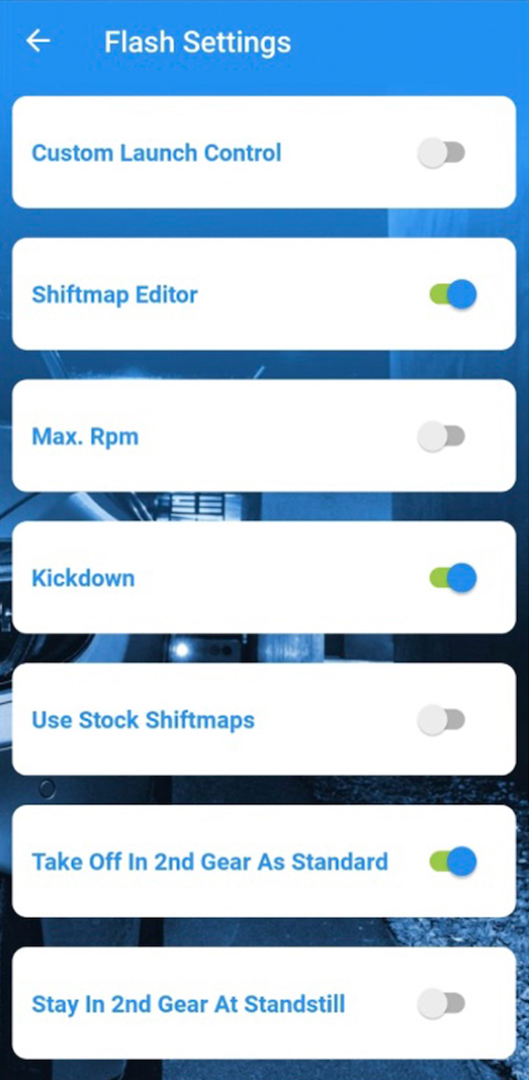
Flash Settings 6-Speed
xHP features a “Customization Module”, which allows users to change certain has “Flash Settings”, allowing the user to change specific settings before flashing an OTS or Custom - Map. The Module This injects those these user-defined values into every Map before flash. Usage each map before it is flashed.
Use is simple: Just do your settings, save them and
adjust the desired settings
save the settings
flash any map to apply
the settings.
You must flash your vehicle car after changing settings. Just being Being connected to the car is car is not enough.
You can access the Module through the module via the “edit” button. right next to “Flash Settings” button at the bottom of the Map-Flash Screen.
Please note , that the Module module is not available for all vehicles and /or engine/transmission gearbox combinations.
| Info |
|---|
Due to the different generations of transmission controller controllers used by BMW during the production time, some of them do cars may not support all existing custom features. To see what Flash settings your specific car can support, please connect the app to your car and click on it. Then in the lower right corner, click on the blue “flash” icon “FLASH THIS CAR” and then on the gear symbol. This can be done without acquiring purchasing a licenselicence. |
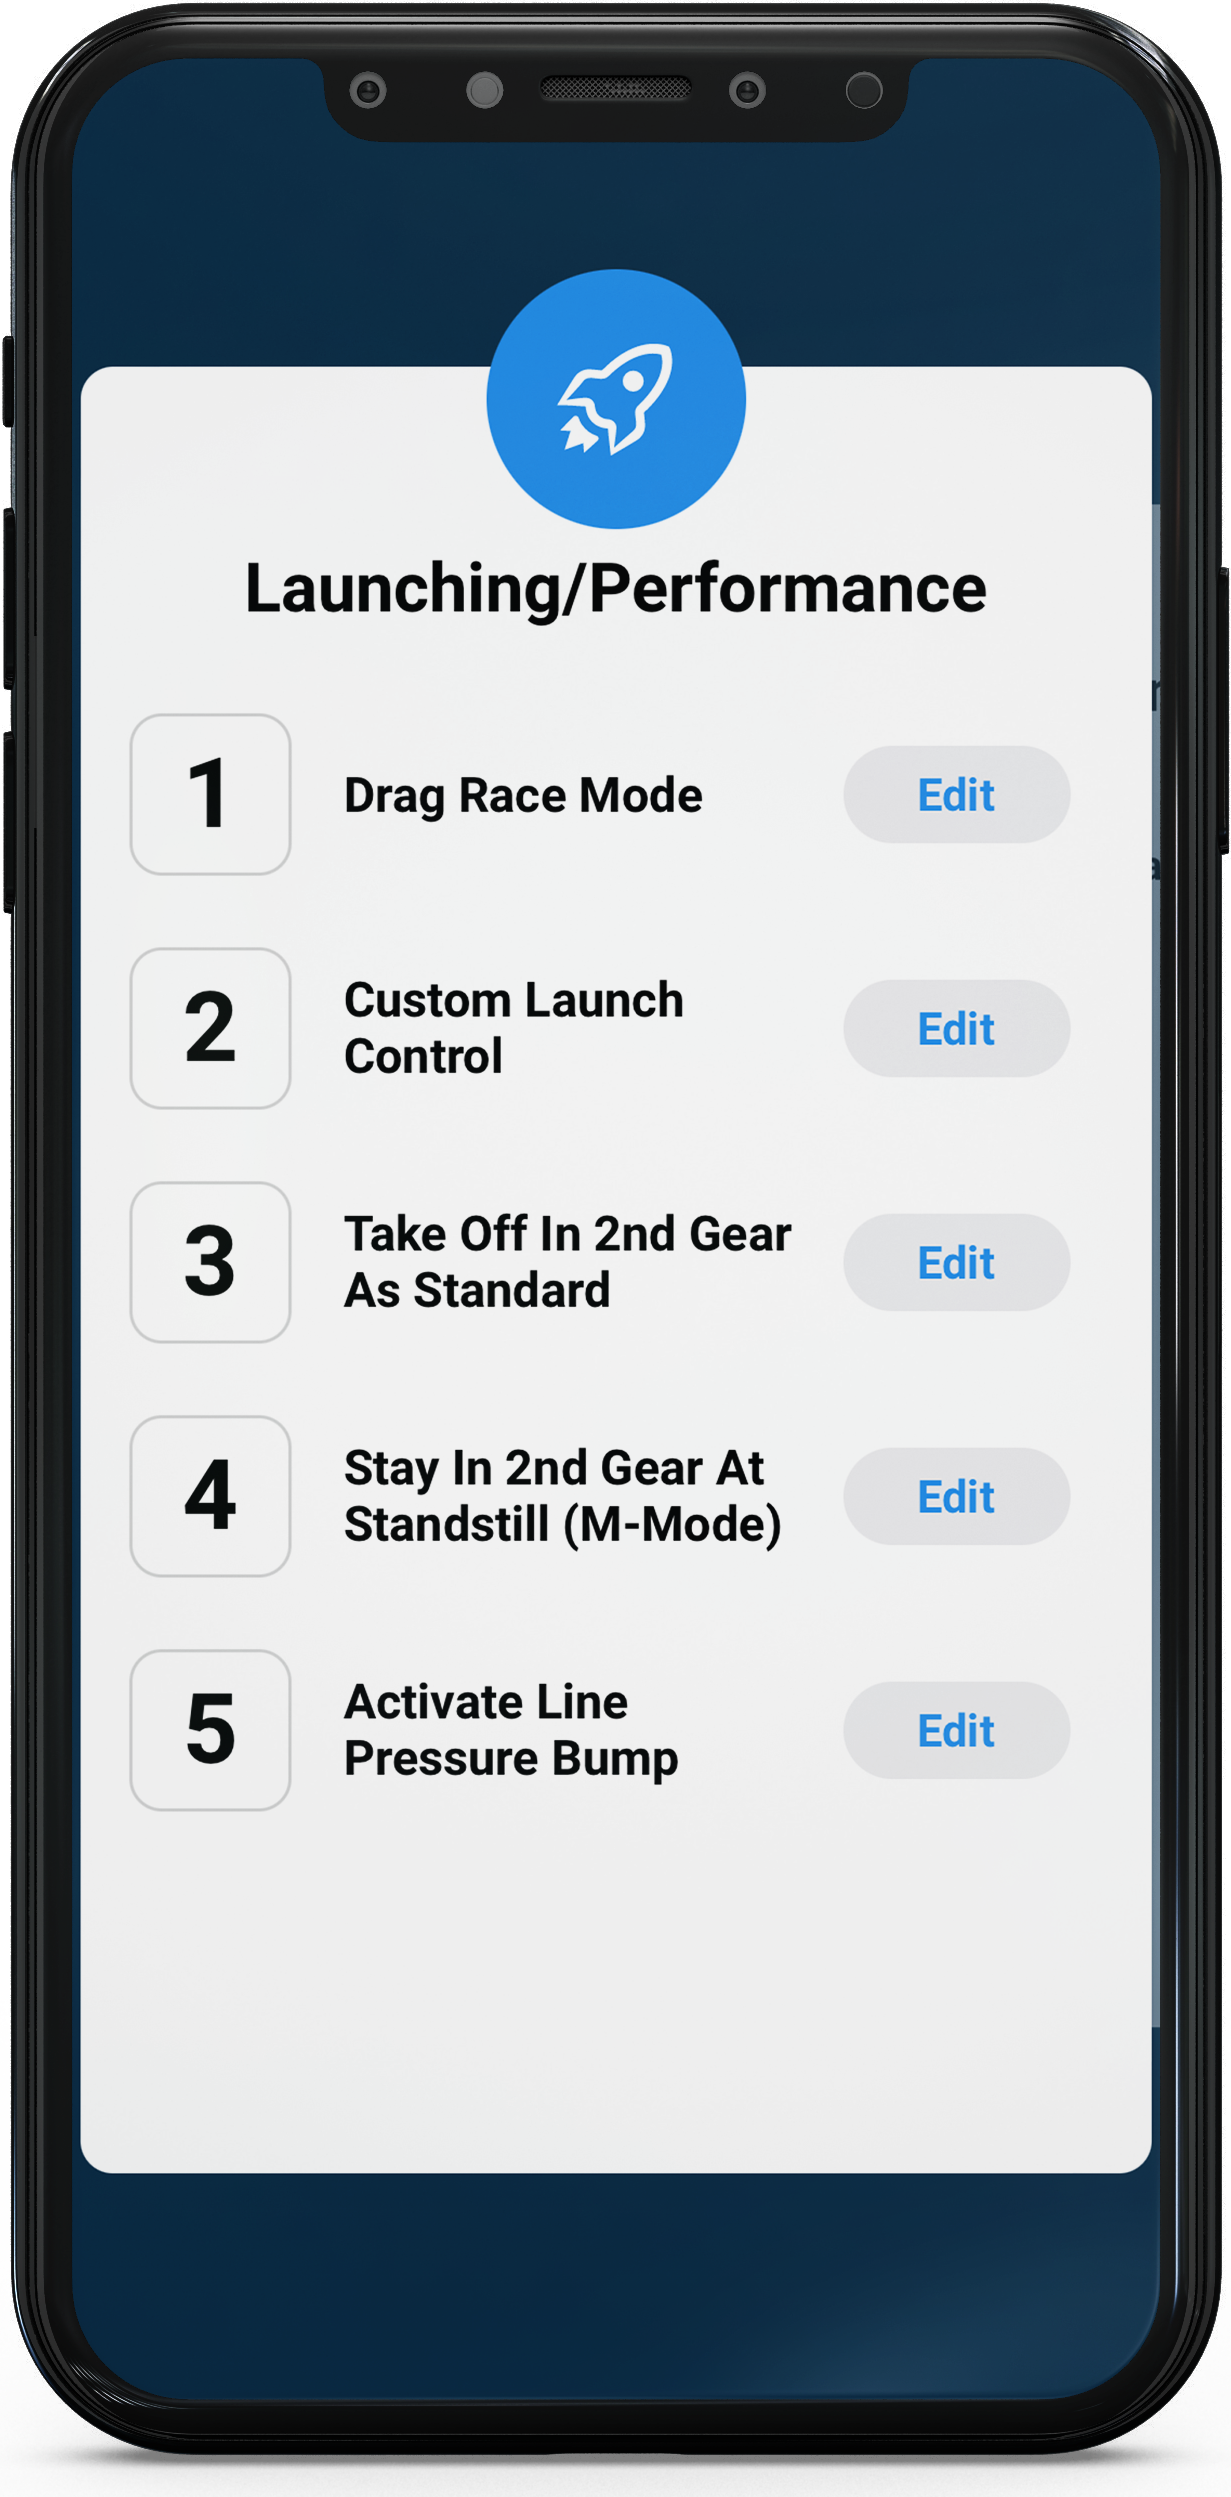
Custom Launch Control 6-Speed
Launch Control on 6-Speed cars is done through restricting the maximum torque allowed during brake boosting and in 1st Gear. For normal RWD cars use 350 ftlb/450Nm as a starting point. On most AWD cars controlling torque is not necessary at all, as they have more than enough traction. If you have traction issues in the upper gears as well, use the "TQ Limit per Gear" panel to manage them.
| Info |
|---|
As the Custom Launch Control feature is realised by restricting max. torque during brake boosting, it is always “active” during brake boosting and does not need a special procedure to be activated. |
Drag Race Mode
Drag Race Mode is designed to extract the absolute maximum from your transmission and boost your 0-60 and 60-120 times! Torque Reduction during shifts is completely disabled, shift pressures are maxed out and clutch protection thresholds are raised so you can put the full power of your engine to the ground, no matter what happens.
Omitting torque reduction during shifts, will lead to better acceleration times. This is especially true on turbo-charged cars, as the engine does not need to cut boost during overlap phase of the transmission. To match the additional load on the clutch packs, shifts will be carried out with maximum possible pressure. Stock safety thresholds for clutch-load are raised accordingly. The 8-Speed transmissions employ a similar logic during Launch Control operation but Drag Race Mode takes this idea even a bit further. Also Launch Control mode will be internally disabled on some cars after a certain counter has been reached. Drag Race mode will inhibit the LC counter and will be available permanent.
Drag Race Mode will automatically enable in Launch Control mode and in Sport+/DSC OFF mode (8-Speed) or in Manual mode (6-Speed). The raised pressures will get noticeable only above approx. 40% throttle. Normal daily driving in Comfort/D is unaffected. However, please keep in mind that this is a true performance function and should not be used permancently. Usually all of our Stages are developed withing the limits of the transmission, to ensure unaffected longevity and stock-like trouble free operation.
Drag Mode intentionally ignores such limits in favor of maximum performance and should therefore only be used in special situations, e.g. competing on the Drag-Strip! Drag Mode can be applied to any of the Stages or even to your Stock file.
| Info |
|---|
The Activation Threshold, when Drag-Mode gets activated by the throttle pedal position, can be adjusted:Lower Threshold: around 30% throttle pedal position
|
| Note |
|---|
Please note, that expected wear on clutch packs is around 4 times higher and transmissions in less than optimal working-state can develop mis-shifts! This is especially true for highly tuned vehicles already experiencing issues with clutch-slip! Software can’t exceed the limits of your hardware! |
Max. RPM
Enables users to setup their own shift points for WOT. (= Wide Open/Full Throttle). “Max. RPM” can be setup separately for D, S and M mode. Please note, these values are only used when not activating the Kickdown.(threshold at the end of the throttle travel)Kickdown
Enables users to enable/disable usage of the Kickdown-Switch, separately for D, S and M modes. There are 3 settings: Default, On, Off. Default uses whatever is setup in the flashed Map. On and Off override the setting in the Map respectively. Please note, that “Kickdown Off” does NOT mean, the car won’t downshift anymore. Just the maximum speed for downshift in each gear, when full throttle is applied, will be lowered!
| Info |
|---|
Only available for 6-Speed |
Gear Display
Enables users to customize the display of the current gear in the dash. Four settings are available: Default, Gear Display Off, Display Actual Gear, Display Target Gear. Default uses whatever is setup in the flashed Map. Off, turns the Display off. The Dash will show just the current mode, but not the current gear (except in manual). Display Actual Gear and Display Target Gear will show the current gear in all modes (D, S and M), but differ in terms of when the display switches to the next gear. “Display Actual Gear” will let the display switch, when the shift is fully processed, and the next gear already engaged by the trans. “Display Target Gear” will switch the display right at the beginning of the shift. Perception of drivers is different, in terms of what is the correct time for changing the gear- display in the dash.
Should there be an error with displaying the current gear, please take a look at our FAQ.
Stay in 2nd Gear in M-Mode
Let’s you chose whether the transmission shifts down to 1st or 2nd gear at standstill. (in M-Mode)
| Info |
|---|
Only available for 6-Speed |
Take-Off in 2nd Gear
Especially on higher powered cars staying in 2nd Gear at standstill adds to a comfy ride during daily driving (you save 1 shift on each junction) and can even help to optimize 0-60 time on high power RWD cars with limited traction. xHP lets you choose whether to activate this function for D, for S or for both modes. This comes with no downsides in terms of wear as torque converters transmit torque through fluid, rather than friction plates (like in a manual transmission or Double-Clutch-Transmission) The slightly higher slip when taking off therefore has no effect on wear.
The transmission will revert to standard behavior when necessary, for instance in the following situations:
When activated for D-Mode only, the trans will revert to 1st Gear when switching to S and/or when setting Sport or Sport+ with the DEC Switch
In D/Comfort mode the transmission will revert immediately to 1st Gear when activating Kickdown. (Emergency Function)
On cold start (some vehicles)
On inclines or with a trailer attached
When transmission is overheated
Throttle Blips in M-Mode
Throttle Blips are used to rev-match the engine on downshifts. This function lets you setup the aggressiveness of downshift blips in manual mode. The main goal of rev-matching is to speed up downshifts by actively matching the Engine-RPM to the Target-RPM in the Target-Gear. This is done, by applying a short blip to the throttle during the transition phase between 2 gears. Users can alter the intensity of this blip, by +-50%, compared to the setting in any of the OTS Maps or Custom Map used. Higher values will lead to more audible and faster blips but can get uncomfortable. Lower values will lead to a slower but smoother rev-match. Please note, that this function does not support all vehicles/maps. Generally supported are Stage 3 Maps and N54/N55 vehicles, as well as all cars with 8- Speed Transmission.
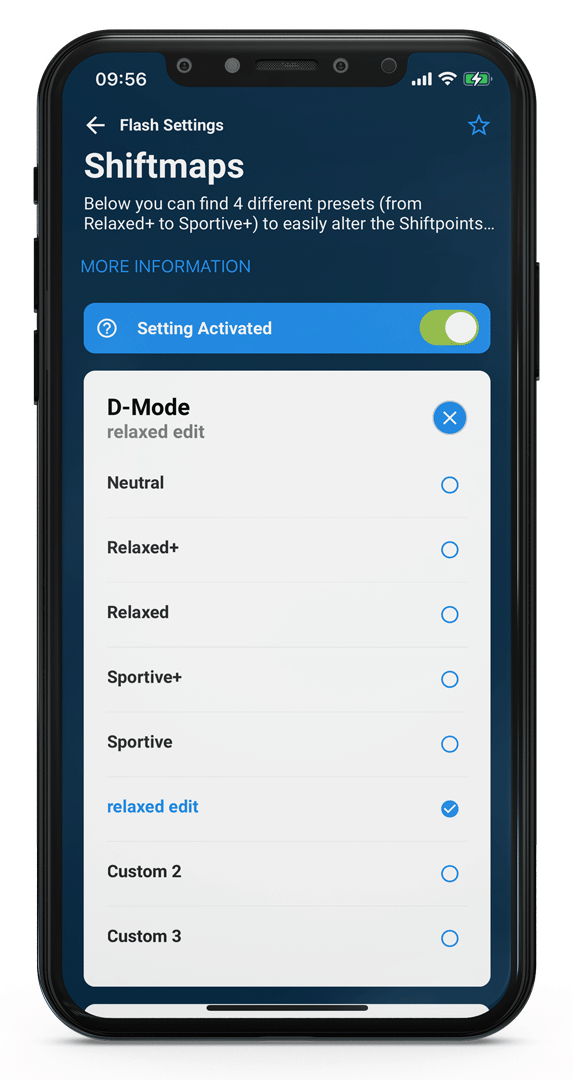
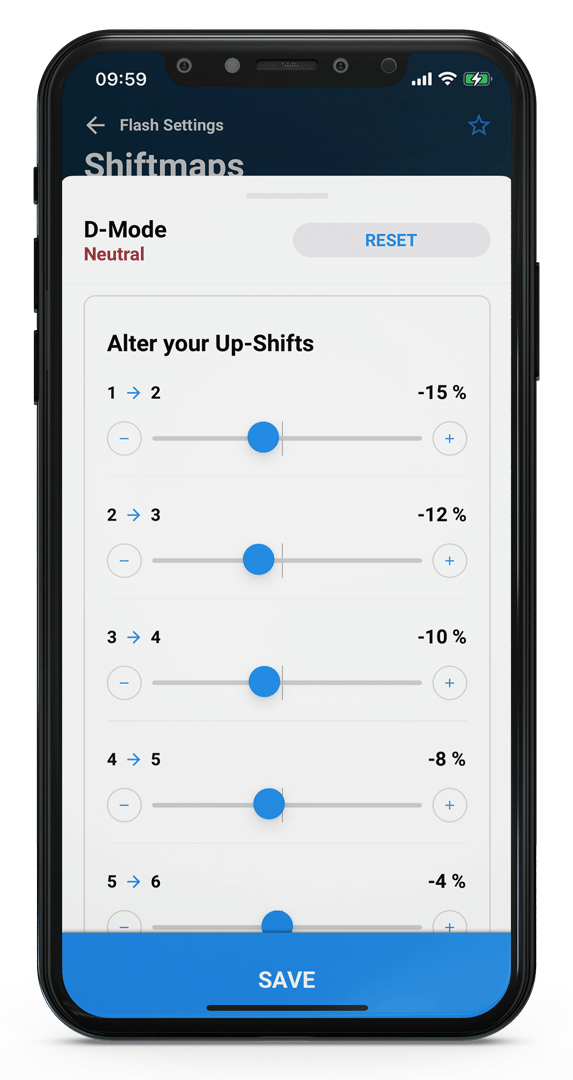
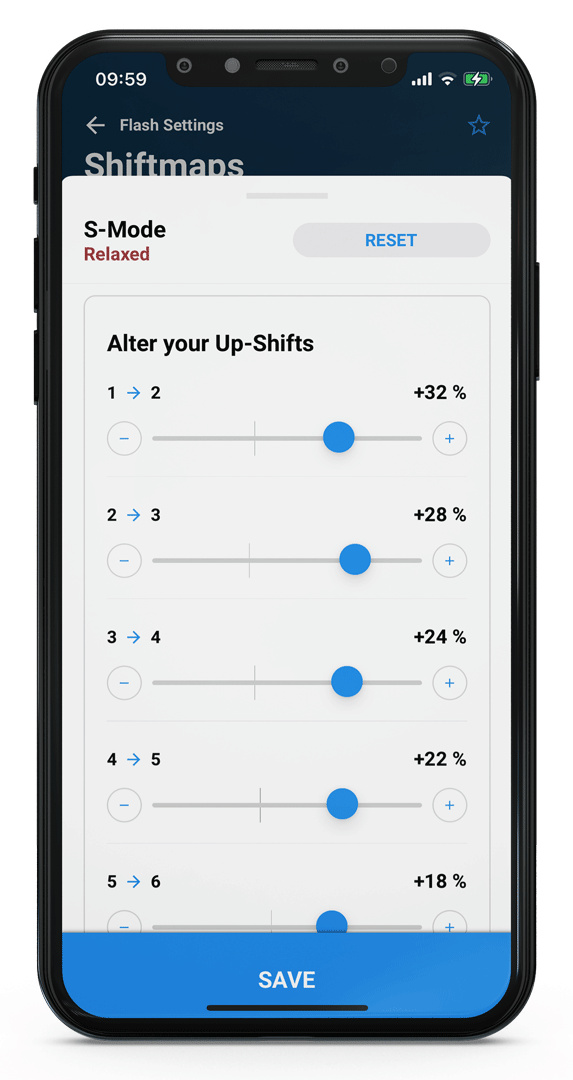
Shiftmap Editor with Presets
The shift map editor enables you to change all shift points in D and S mode to your personal liking. For instance you can make your car shift later from 1st to 2nd Gear when accelerating, or vice versa. Or make it hold 8th Gear for longer on the Highway when accelerating. For an easy start, xHP offers 4 presets: Relaxed, Relaxed+, Sportive and Sportive+.
Those presets make it easy to do a quick test on your car and experience the changes. Just select a preset and flash any map again. xHP will automatically apply the Presets to your Shiftmap during the Flash. Presets work with your Stock Calibration, with all OTS Maps and with Custom Files flashed.
Relaxed and Relaxed+: Your car will shift earlier up and will be less eager to downshift when pressing the throttle.
Sportive and Sportive+: Your car will shift up later and will stay for longer in lower gears. It will also react more quickly to throttle inputs and will be more happy to shift down.
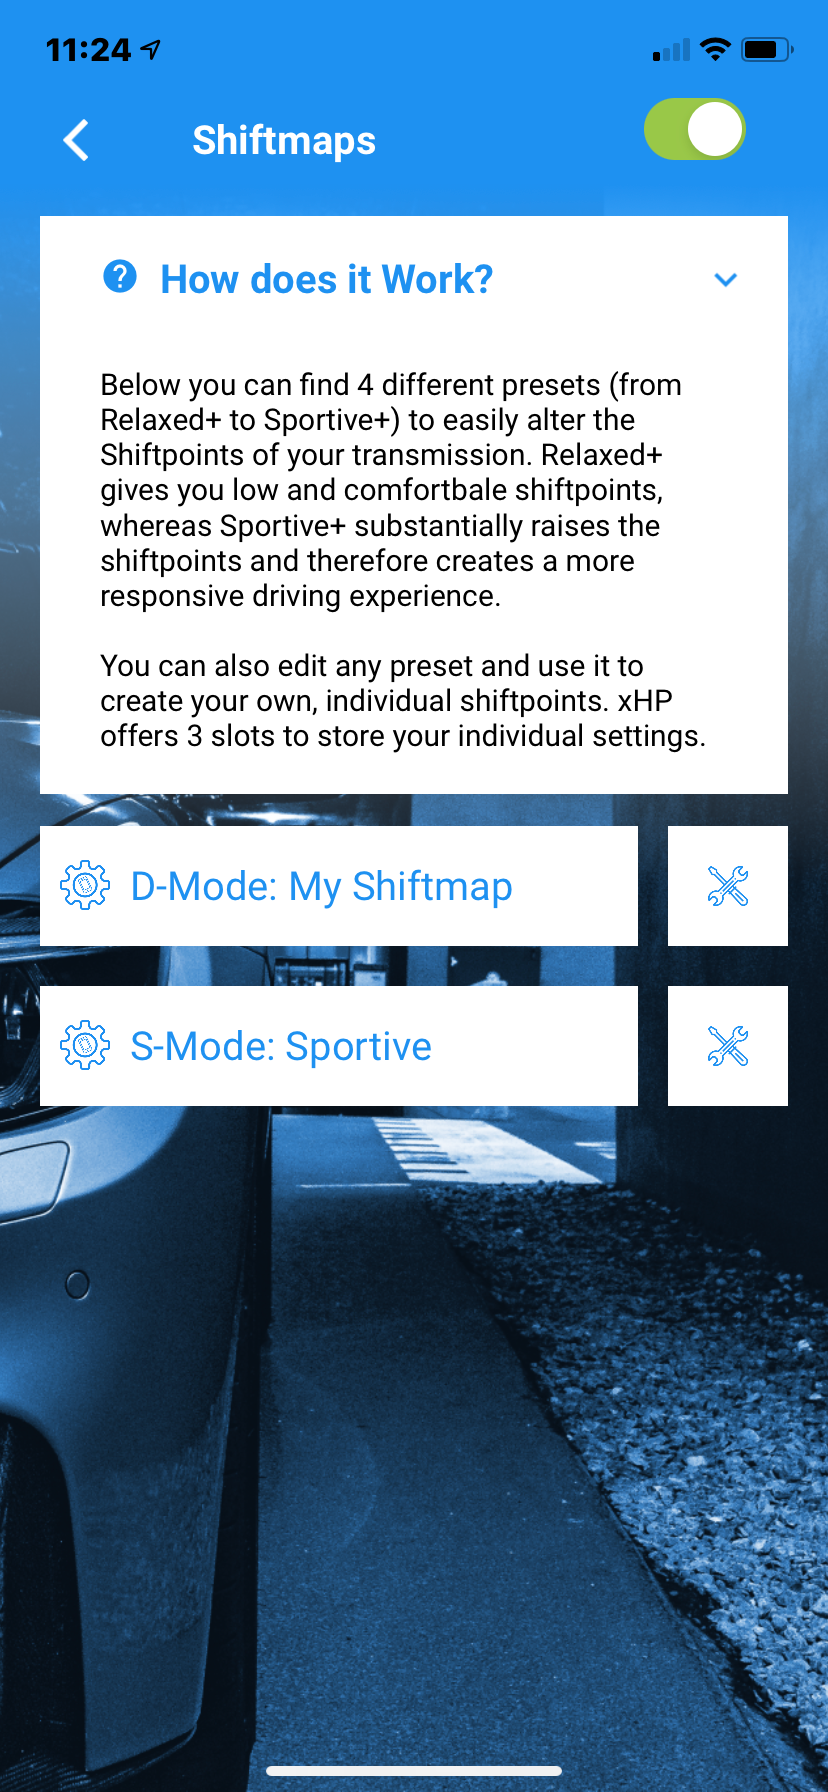
Main Page

Select Preset
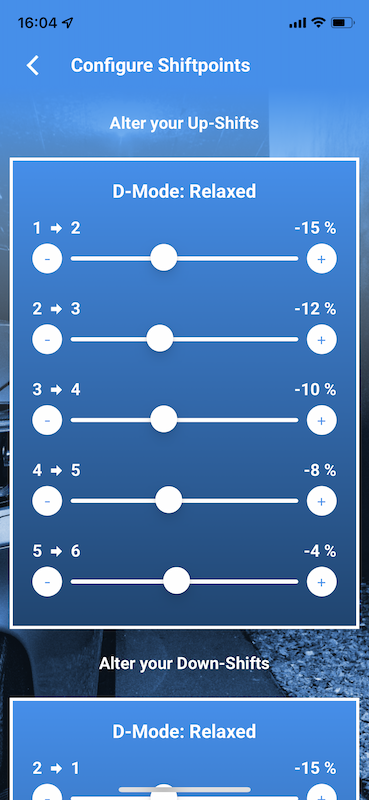
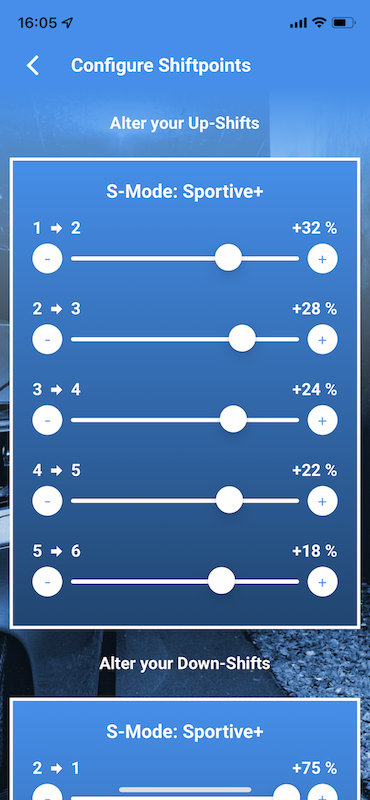
Shiftmap Editor: Editing Presets
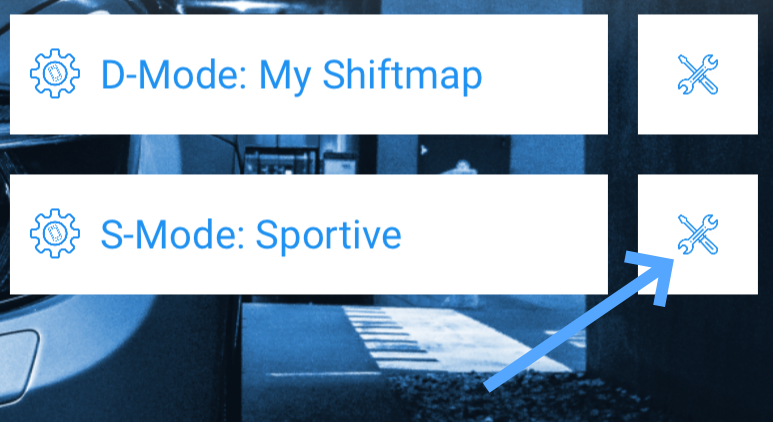
For further tailoring, you can also edit any of the Presets, and save your changes in up to three custom slots. Just select a Preset from the Dropdown and click the Toolbox Icon next to it. This will load the Preset into the Editor and expose the stored settings. You can now edit each individual up and downshift and afterwards store your Changes to 1 of 3 custom slots. The Presets itself will stay untouched, so you can always revert to them. Your personal slots also get exported when using the Import/Export feature, so you can easily share them with other users!
Example of relaxed Setting
Editing of Preset “Sportive”
Shiftmap Editor: Setup hints
A “shift map” consists of 10 lines, which are spread over throttle input. Five for upshifting (1-2-3-4-5-6) and five for downshifting. (6-5-4-3-2-1) Up- and downshifts can be independently configured. The setting made in the editor are always relative to the flashed map. You do not set exact shift points, but rather are able to change the shifting of a given OTS or custom map! The spread is from +50% to - 50% for each shift. For example, if your 5-6 shift on low loads normally occurs at 50 mph, but you want it not to happen before 55 mph, pull the 5->6 slider to + 10%. Same goes for the downshifts. If your trans normally downshifts on 40 mph from 6->5 during coasting, but you want that to happen at 50 mph, pull the slider for 6->5 up to +25%.
Be sure to make sensible changes. If you alter the 1-2 shift upwards, you should do the same gradually to the subsequent shifts, to get a “natural” shift-feel during driving. Rule of thumb is to make bigger changes on the lower gears, and smaller changes on the upper gears. However, you are free to experiment with these settings. xHP pre-calculates and validates all changes against every OTS Map stored on the device. A fixed ruleset gets applied to auto-correct "wrong" settings and prevent dead-locks. Such a dead-lock could happen if your 2-3 upshift-point would be set below the 3-2 downshift-point, or if an upshift would lead to a target RPM below idle- speed of the engine.
Below is an example how to turn the standard Stage-3 Map of a 335i in D-Mode into a very comfortably and low shifting Map:
UPSHIFTS
1->2: - 20%
2->3: - 16%
3->4: - 12%
4->5: - 8%
5->6: - 4%
DOWNSHIFTS
2->1: 0%
3->2: 0%
4->3: - 2%
5->4: - 2%
6->5: - 2%
This setting will let the trans shift instant to 2nd gear after take-off in D-Mode and keeps revs steady below 2000 RPM on a 335i E90, during normal driving in traffic. This is just an example, but users are encouraged to experiment and find their own personal best shift map. The Shift point Editor lets you change the character of a given map very much, by just pulling a few sliders.
Use Stock Shiftmaps
This option will always keep the stock shift points, no matter what map you flash. Changes in the Shift point – Editor will be done relative to the Stock-Shift maps!
Shift Speed in M-Mode
This panel lets you fine-tune the Speed of each upshift in M-Mode! Positive values (slider to the right) mean FASTER but harder and therefore less comfortable shifts. Negative values (slider to the left) mean SLOWER but smoother and therefore more comfortable shifts. For example, if you have the feeling that the 1-2 shift in M is too hard, pull the slider to the left, to make it smoother. You can experiment to find your optimal setting. There are no "dangerous" settings possible.
Lockout 6th Gear in S-Mode
Since launch of xHP this is an endless debate. Some users want the trans to engage 6th Gear on Highway Speeds when using S-Mode, others don't and complain about the exact same thing. Most BMW do not use 6th Gear in S-Mode. That’s factory setup and is due to German Autobahn. Nothing more annoying than a transmission shifting back and forth between 5th and 6th Gear on steady 200km/h+ drives. On the other side, customers in other countries use S-Mode as Standard mode and complain about bad mileage on the highway. Our OTS Maps mostly use 6th Gear in S-Mode, as most of our customer base does not have the pleasure of unlimited motorways. To end this struggle, users can use this switch to lockout 6th Gear in S, despite most of our OTS Maps are configured different.
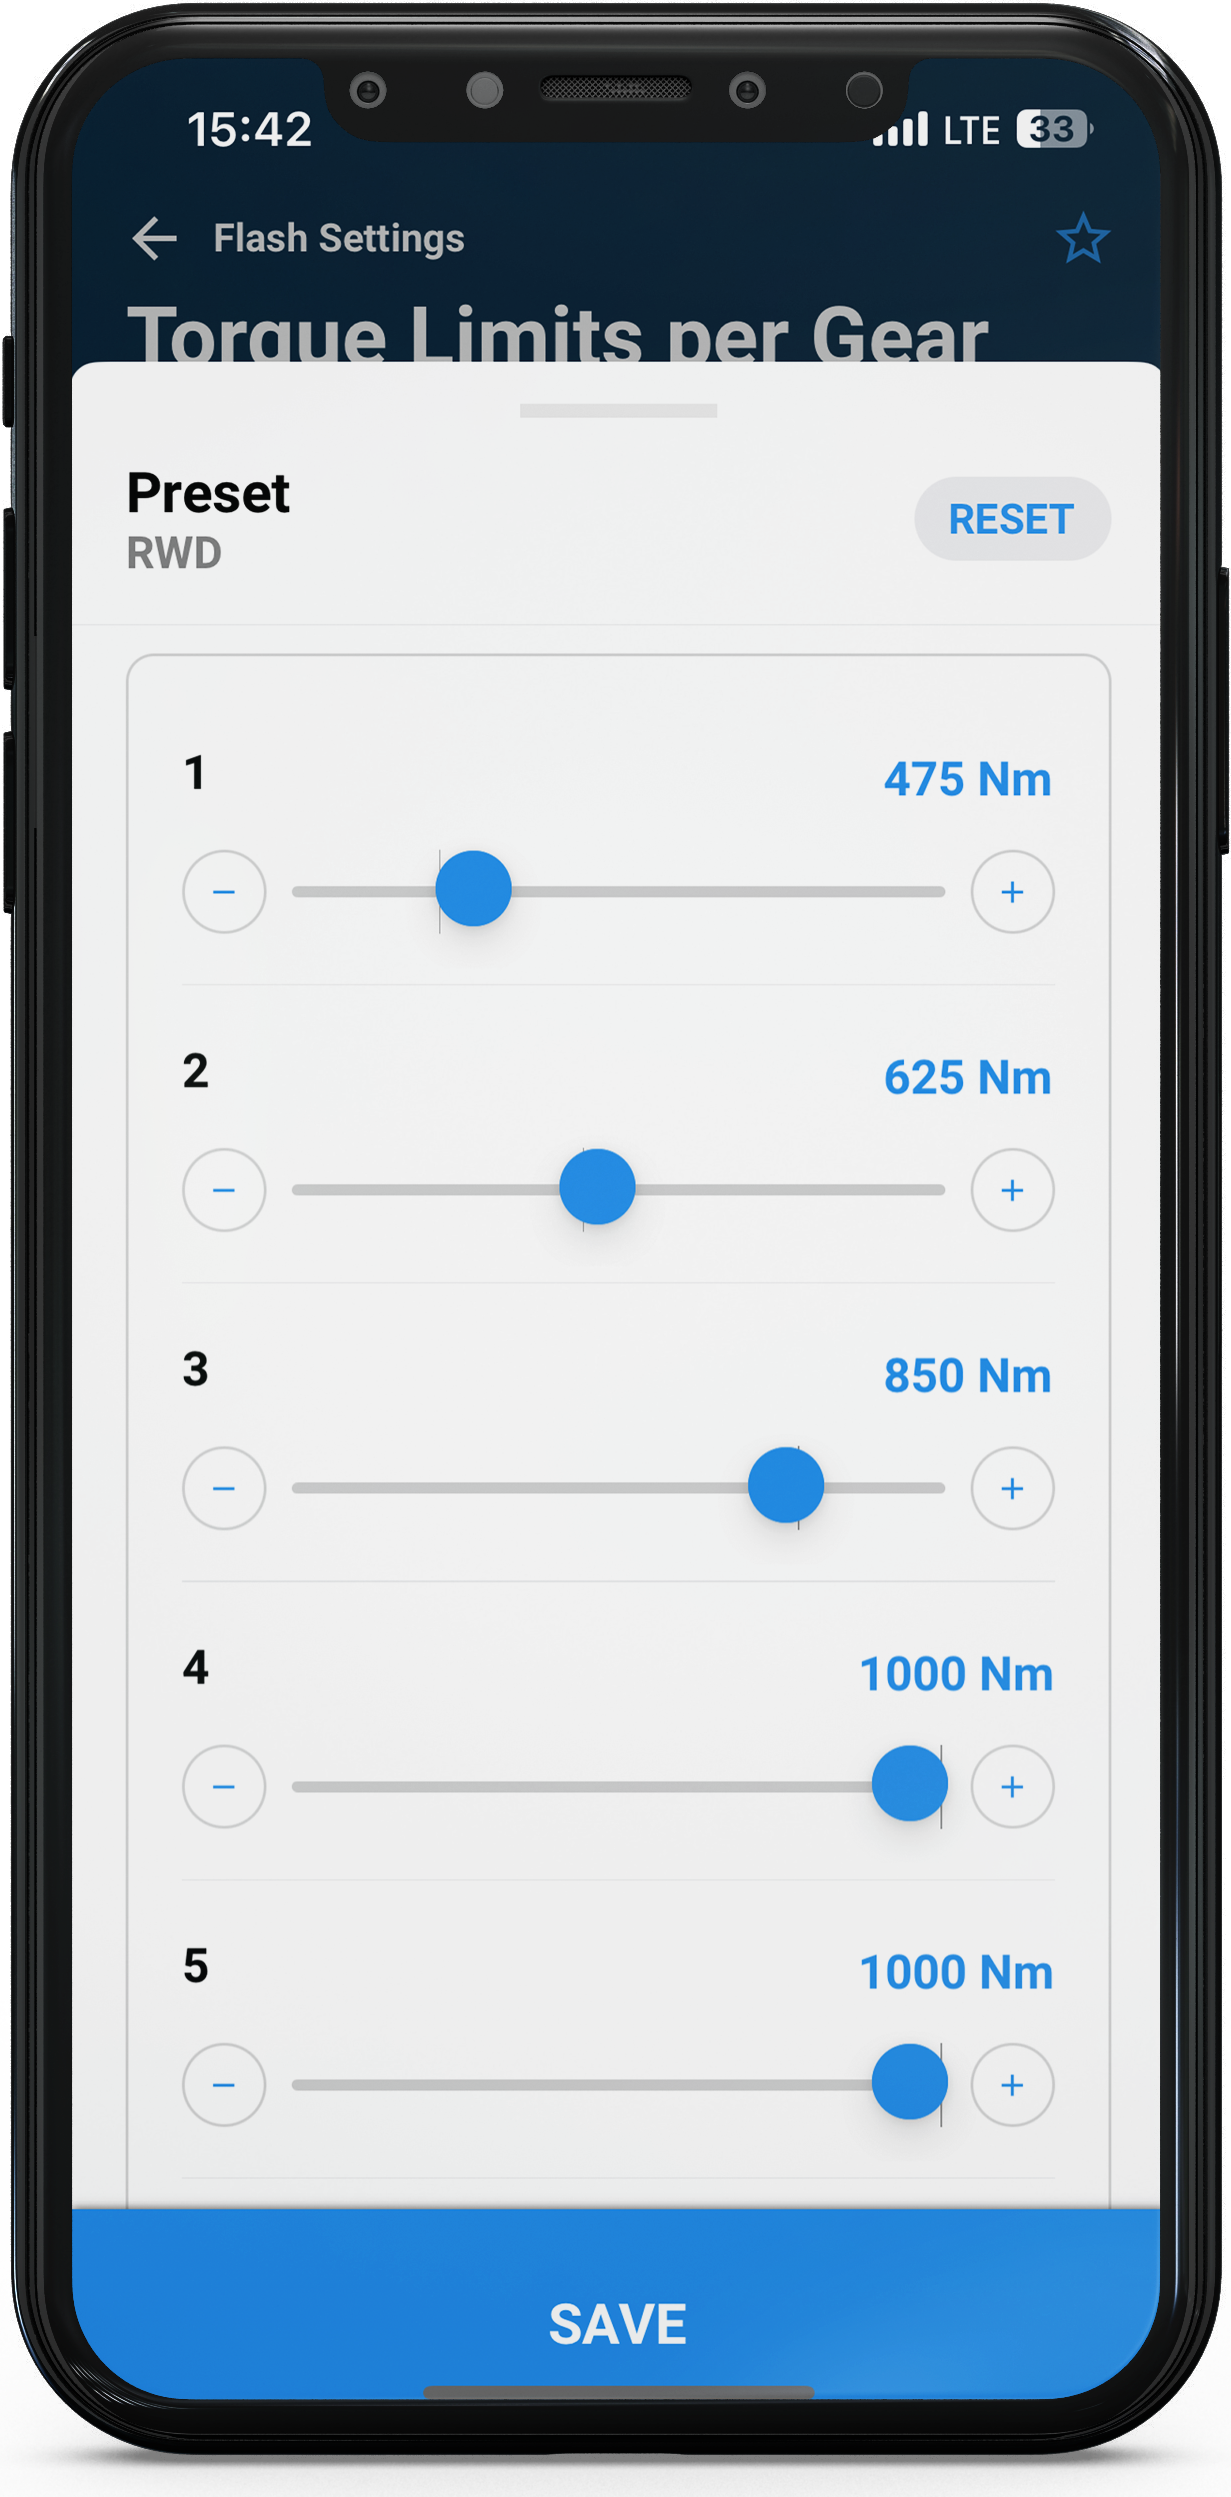
Torque Limit per Gear
Especially on high power RWD cars limiting torque in the lower gears can improve traction and make them easier to handle. xHP offers a range from 300 Nm (221 ft lbs.) to the possible maximum of 1000 Nm (737 ft lbs.) for each gear. It can be used either to limit boost in the lower gears, or to limit the engine power overall in all gears to protect the drive-train components. The electronic limiter works by sending a request to the ECU (Engine Control Unit) to lower torque once the limit is reached. The ECU then takes the necessary measures (close the throttle/lower boost/lower timing) to stay steady on this limit. It's the same method applied during shifts, when the TCU (Transmission Control Unit) also takes over the torque control from the engine to enhance the shifting. This method of control works steady and within split seconds. We also included presets for RWD, RWD with Sticky Tires and AWD cars, to get you a baseline. Start with this settings and test how your car behaves in your environment. Based on the properties of your car (weight, tires, suspension, differential etc.) and the roads you travel on usually, you can then adjust the limits up/down until it matches perfect.
Torque Reduction during upshifts
This function lets you setup how much torque reduction the gearbox is requesting from the engine during upshifts. Just like with a manual, where the driver presses the clutch while releasing the throttle, the automatic transmission sends a request to your vehicles engine to lower torque while it's shifting from one gear to another.
Lowering the amount of torque reduction (Slider to -) can reduce turbo lag after shifts, especially in the lower gears. The opposite, raising the torque reduction (Slider to +), can produce faster/crisper shifts. The main purpose of this function is to fine tune your shifts to your current engine setup, as every aftermarket component or tune slightly alters the behavior of the engine during shifts. Tuned cars with big turbos may need general less reduction, than ones with stock turbos. If you experience a bit of "lag" on a certain shift, you can also try to lower the torque intervention by a few % until it starts to smooth out. Reducing the amount of torque pulled during a shift puts more load on your clutches and stretches the shift-time a bit, so just minimizing all values won't do the trick.
Users are advised to use this function with care. It's not dangerous to play around with it, just to feel the effects, but you have to be aware that lowering torque reduction substantially (e.g. -25%) over extended periods will increase load on the clutches and will reduce their lifetime.
Line Pressure Bump
The “Line Pressure” is the main pressure the transmission operates with, outside of shifts. Main input for the calculation of the Line Pressure is the torque actual value sent by the cars Engine Computer (ECU, DME) The pressure gets regulated by an electronic valve, controlled by the TCU (Transmission Computer). Depending on transmission type, the ZF units typically operate with a maximum of 16 – 20 Bar oil pressure. The higher the pressure, the higher the clamping force of the clutches and the higher the maximum amount of torque, that can be transmitted through the clutch pack, before it starts to slip and quickly burn. This custom option tweaks the transmissions mapping to allow for around 5 to 15% more peak pressure. Usually the ZF transmissions can easily cope with the typical torque increase of a Stage 1 or 2 Engine Tune, when equipped with an xHP OTS Map. However, for very high power increase, this option can make the difference, whether your clutch pack is able to withstand or not. We suggest applying this option only, if you are already running into clutch slip issues, or if your engine tune creates more than approx. +40% - 60% over stock torque. It is usually not needed for Standard Tunes.
Valet-Mode
•limits your vehicles power to approx. 100 HP in lower gears, 130 HP in higher gears
•limits max. RPM to 2500-3000 approx.(depending on vehicle)
•disables Kickdown
•inhibits too early downshifting in Manual mode (max. 2500 RPM)
•locks down the transmission in its slowest operating mode
•inhibits Launch Control/Brake-Boosting.
Launching &
Performance Options
Drag Race Mode
“Drag Race Mode” is designed to squeeze the absolute maximum out of your transmission and improve your 0-60 and 60-120 times! Torque reduction during shifts is entirely disabled, shift pressures are maxed out, and clutch protection thresholds are raised to put your engine's full power to the ground no matter what.
The absence of torque reduction during shifting results in better acceleration times. This is especially true on turbocharged cars, as the engine does not have to reduce boost during the overlap phase of the transmission. Shifts are made with the maximum possible pressure to compensate for the additional load on the clutch packs. The standard safety thresholds for clutch load are increased accordingly.
The 8-speed transmissions use a similar logic in Launch Control mode, but Drag Race mode furthers this idea. Launch Control mode is also internally disabled on some cars after reaching a specific counter. In Drag Race mode, the LC counter is disabled and is permanently available.
Drag Race mode is automatically activated in Launch Control mode and Sport+/DSC OFF mode (8-speed) or Manual mode (6-speed). The increased pressure only becomes noticeable above about 40% throttle. Everyday daily driving in Comfort/D is unaffected.
Please note that this is a real performance feature, causing more wear on your transmission and should not be used permanently.
All our stages are typically developed within the transmission limits to ensure unaffected longevity and stock-like trouble-free operation.
Drag Mode deliberately ignores these limits for maximum performance and should only be used in particular situations, such as drag strip competition! Drag Mode can be applied to any of the stages or even to your stock file.
| Info |
|---|
The Activation Threshold, when Drag-Mode gets activated by the throttle pedal position, can be adjusted:
|
| Note |
|---|
Please note that expected wear on clutch packs is around four times higher and transmissions in less than optimal working-state can develop mis-shifts! |
Custom Launch Control 6-Speed
Launch control on 6-speed cars is achieved by limiting the maximum torque allowed in first gear during brake boosting. RWD cars use 350 ft-lbs/450Nm as a starting point.
For most AWD cars, torque control is unnecessary as they have more than enough traction. If you have traction problems in the upper gears, use the “TQ limit per gear” panel to manage them.
| Info |
|---|
As Custom Launch Control is achieved by limiting the maximum torque during brake boosting, it is always "active" during brake boost and requires no special procedure to activate. |
Override Brake Boost Protection
| Info |
|---|
Brake Boosting means building torque against the applied brakes during a standstill. On turbocharged vehicles, this allows the turbo to spool and have a certain amount of boost ready when releasing the brakes. |
The ZF6HP and ZF8HP use a torque converter to amplify the torque coming from the engine before it enters the rest of the driveline. This amplification must be considered while brake boosting to protect the transmission and the rest of the driveline.
ZF torque converters' typical torque multiplication factor during brake boosting is around 1.75 - 1.9. (Engine speed > 800 rpm and turbine speed: 0 rpm).
| Panel | ||||||||
|---|---|---|---|---|---|---|---|---|
| ||||||||
Example: A standard 335i F30 sends 400 Nm of torque from the engine. This is amplified to around 750 Nm (400 * 1.9) before the torque goes through the transmission. Through the gear ratios of the transmission and final drive, this torque is further amplified, and so you end up with a whopping ~ 11,300 Nm (~ 8330 ft-lb) of torque driving your wheels. Here is the full calculation: Brake Boosting Gear 1: 400 Nm * 1.9 [Torque Converter] * 4.714 [Gear1] * 3.15 [Final Drive] = 11.285 Nm Brake Boosting Gear 2: 400 Nm * 1.9 [Torque Converter] * 3.143 [Gear2] * 3.15 [Final Drive] = 7.524 Nm |
This makes torque converters great for launching vehicles, but due to the amplification, the allowable torque from the engine needs to be limited. This limit is independent of any other torque limits and is only applied during the boost phase of the converter.
It is hard-coded per transmission variant (6HP21, 6HP28, 8HP45, 8HP50, 8HP75, etc.) and cannot usually be changed by the calibration engineer. There is a good reason for this: even small changes result in substantial torque jumps after the converter.
The override function in xHP has five settings from 5% to 15% to increase the allowable torque, OR you can turn the protection off completely. If OFF is selected, the engine torque is not limited by this particular function but only by the corresponding gear limiter. (Gear 1 or Gear 2)
| Panel | ||||||||
|---|---|---|---|---|---|---|---|---|
| ||||||||
Example: Here is the calculation for a tuned 335i F30 with a maximum torque of 600 Nm. The standard Brake Boost Limiter limits the maximum torque during boosting to about 400 Nm. Gear 1, Stock Protection: 400 Nm * 1.9 [Torque Converter] * 4.714 [Gear1] * 3.15 [Final Drive] = 11.285 Nm Gear 1, 5% Raise: 420 Nm * 1.9 [Torque Converter] * 4.714 [Gear1] * 3.15 [Final Drive] = 11.849 Nm (+ 564 Nm) Gear 1, 15% Raise: 460 Nm * 1.9 [Torque Converter] * 4.714 [Gear1] * 3.15 [Final Drive] = 12.978 Nm (+ 1.693 Nm) Gear 1, OFF: 600 Nm * 1.9 [Torque Converter] * 4.714 [Gear1] * 3.15 [Final Drive] = 16.927 Nm (+ 5.642 Nm) |
| Info |
|---|
Please note the immense torque gains at the wheels. If the limiter is set to OFF and full boost is applied, this will easily overwhelm the power of your brakes (the vehicle will continue to move forward even though the brakes are fully applied) and may also cause the clutches in the gearbox to slip. (Possible fault code: Gear Ratio Monitoring and limp mode triggered) Depending on the traction available, it may also cause components such as the rear differential or axles to snap when launching. |
| Note |
|---|
This function is a specific offer for Drag Racing purposes only and is NOT intended to be used on standard road vehicles. |
Take-Off in 2nd Gear
Particularly on higher-powered cars, staying in second Gear at a standstill adds to the comfort of everyday driving (you save one Gear at each junction) and can even help optimise 0-60 times on high-powered RWD cars with limited traction.
xHP lets you choose whether to activate this function for D, S, or both modes.
There is no downside regarding wear, as torque converters transmit torque through fluid rather than friction plates (as in a manual or dual-clutch transmission).
The transmission reverts to standard behaviour when necessary, for example, in the following situations:
When activated for D mode only, the transmission will revert to 1st Gear when shifting to S and/or setting Sport or Sport+ with the DEC switch.
In D/Comfort mode, the transmission immediately returns to 1st Gear when Kickdown is activated. (emergency function)
On a cold start (some cars)
On a gradient or with a trailer attached
When the transmission is overheated
Stay in 2nd Gear at a standstill
(in M-Mode)
Let's choose whether the transmission shifts to 1st or 2nd Gear when stopped in M mode.
| Info |
|---|
Only available for 6-Speed only applies to M-mode. |
Activate Line Pressure Bump
Line pressure" is the main pressure at which the transmission operates outside of gear changes.
The primary input for calculating the line pressure is the torque value sent by the car's engine controller (ECU, DME).
The pressure is regulated by an electronic valve controlled by the TCU (Transmission Computer).
ZF transmissions typically operate with a maximum oil pressure of 16-20 bar. The higher the pressure, the higher the clamping force of the clutches and the higher the maximum torque that can be transmitted through the clutch pack before it starts to slip and quickly burns out.
This custom option adjusts the transmission mapping to allow about 5 to 15% more peak pressure.
Typically, ZF transmissions can easily handle the typical torque increase of Stage 1 or 2 engine tune when fitted with an xHP OTS map. However, for very high power increases, this option can make the difference between whether your clutch pack can cope.
| Panel | ||||||||
|---|---|---|---|---|---|---|---|---|
| ||||||||
Setup hint: It is not normally needed for standard tunes. |
Comfort & Economy Options
Disable Cold-Run
In 6-speed transmissions, the lock-up clutch remains open during cold running to deliberately create slippage in the torque converter, which helps to warm up the gearbox oil more quickly.
Like the engine, the gearbox needs oil within a specific temperature range for optimum clutch control.
This switch allows the user to turn off the warm-up phase and skip the torque converter slip for the first few minutes of driving.
After a few seconds of driving, the lock-up clutch starts to work.
Standstill Decoupling
Decoupling at a standstill is a comfort and fuel economy feature that minimises vibration at a standstill and reduces fuel consumption.
This function is active when a gear is engaged at a standstill. Through the torque converter, automatic transmissions create a constant power flow to the wheels when a gear is engaged. This means that the engine must overcome the torque converter's oil pressure when idling.
Decoupling cuts off the power flow after the torque converter by opening a clutch inside the transmission. This allows the engine to idle freely with minimal vibration and low fuel consumption. When the brake is released, the clutch automatically closes to reconnect the power flow.
In comfortable cars, this process is often perceived as a slight delay when moving off. In older/higher mileage cars, the opening/closing of the clutch is sometimes perceived as a slight jolt in the driveline. This function can be used to disengage the clutch at a standstill permanently.
Shifting
Shiftmap editor with Presets
The shiftmap editor allows you to change all shift points in D- and S-mode to suit your personal preferences. For example, you can make your car shift later from 1st to 2nd Gear when accelerating, or vice versa. Or keep the car in 6th Gear longer when accelerating on the motorway.
For an easy start, xHP offers four presets: Relaxed, Relaxed+, Sport and Sport+.
These presets make it easy to test your car and experience the changes quickly. Select a preset and flash any map again. xHP will automatically apply the presets to your shift map during the flash. Presets work with your stock calibration. All flashed OTS maps and custom files.
Relaxed and Relaxed+: Your car shifts up earlier and is less eager to downshift when you press the accelerator.
Sportive and Sportive+: Your car shifts up later and stays in lower gears longer. It responds more quickly to throttle inputs and is willing to shift down.

Shiftmap Editor: Editing Presets
You can edit any presets and save your changes in up to three custom slots for further customisation. Select a preset from the drop-down list and click the toolbox icon.
This will load the preset into the editor and reveal its saved settings. You can edit each up- and downshift and then save your changes to one of the three custom slots.
The presets themselves remain untouched, so you can always return to them. Your Custom Slots are also exported when you use the Import/Export feature, so you can easily share them with other users!
Shiftmap Editor: Setup hints
A "shiftmap" comprises ten lines spread across the throttle input.
Five for upshifts (1-2-3-4-5-6) and five for downshifts (6-5-4-3-2-1). The upshifts and downshifts can be configured independently. The settings made in the editor are always relative to the flashed map. You do not set exact shift points, but you can change the shifting of a given OTS or custom map! The range is from +50% to -50% for each shift.
| Panel | ||||||||
|---|---|---|---|---|---|---|---|---|
| ||||||||
Example: If your 5-6 shift normally occurs at 50 mph under light load, but you want it to occur at The same goes for downshifts. If your gearbox normally downshifts at 40 mph from 6->5 when coasting, but you want it to happen at 50 mph, pull the slider for 6->5 up to +25%. |
Make sure you make sensible changes. If you change 1-2 up, you should do the same gradually with the subsequent shifts to get a 'natural' shift feel while driving. A good rule of thumb is to make more extensive changes in the lower gears and more minor changes in the higher gears.
However, you are free to experiment with these settings. xHP pre-calculates and validates all changes against each OTS map stored on the unit. A fixed set of rules is applied to correct 'wrong' settings and prevent deadlocks automatically. Such a deadlock could occur if your 2-3 upshift point were set below the 3-2 downshift point or if an upshift resulted in a target RPM below engine idle.
Below is an example of how the standard Stage 3 map of a 335i in D-mode can be turned into a very comfortable and low-shifting map:
UPSHIFTS
1->2: - 20%
2->3: - 16%
3->4: - 12%
4->5: - 8%
5->6: - 4%
DOWNSHIFTS
2->1: 0%
3->2: 0%
4->3: - 2%
5->4: - 2%
6->5: - 2%
This setting allows the transmission to shift into the 2nd Gear immediately after starting in D-mode and keeps the revs below 2000 rpm during normal driving in traffic on a 335i E90.
This is just an example, but users are encouraged to experiment and find their best shiftmap. The Shift Point Editor allows you to change the character of a given map with just a few sliders.
Use Stock Shiftmaps
This option will always keep the stock shift points, no matter which map you flash.
With this feature enabled, changes in the shiftmap Editor will be relative to the stock shiftmaps, not the shiftmaps of any OTS map you may have flashed!
Shift Speed in M-Mode
This panel allows you to fine-tune the speed of each upshift in M-mode!
Positive values (slider to the right) mean FASTER but harder and, therefore, less comfortable shifts. Negative values (slider to the left) mean SLOWER but smoother and, therefore, more comfortable shifts.
| Panel | ||||||||
|---|---|---|---|---|---|---|---|---|
| ||||||||
Example: If you find the 1-2 shift in M too hard, move the slider to the left to make it smoother. |
Torque Reduction during upshifts
This function allows you to adjust how much torque reduction the transmission requests from the engine during upshifts. Just as in a manual gearbox, where the driver presses the clutch while releasing the accelerator, the automatic transmission requests the engine to reduce torque as it shifts from one Gear to another.
Reducing the amount of torque reduction (slider to -) can reduce turbo lag after shifts, especially in the lower gears. Conversely, increasing the amount of torque reduction (slider to +) can produce faster/sharper shifts.
The primary purpose of this function is to fine-tune your shifts to your current engine setup, as any aftermarket component or tuning will slightly alter the engine's behaviour during shifts.
Tuned cars with large turbos may require less reduction than cars with stock turbos. If you experience a bit of "lag" on a particular shift, you can also try reducing the torque reduction by a few percentage points until it starts to smooth out.
Simply minimising all values won't do the trick, as raising the amount of torque pulled during a shift will put more strain on your clutches and extend the shift time a little.
| Panel | ||||||||
|---|---|---|---|---|---|---|---|---|
| ||||||||
Setup hint: |
Reassign Shift-Speed
The 6- and 8-speed automatic transmissions have three different shift speeds (Standard, Medium, Fast), which the TCU selects during driving based on several parameters.
For example, when the sport button is active, when the car is in manual mode or when the driver presses the accelerator quickly. Sometimes, the shift speed can also be limited generally, for example, when towing a trailer or during cold running.
The shift programs can be reassigned to this panel. For example, you can set the "Fast" program always to be active.
(= set “Standard” and “Medium” to “Fast”)
Or you can set the "Medium" shift program as the minimum available speed.
(= set “Standard” to “Medium”)
Driving
Kickdown
Allows the user to enable/disable the use of the kick-down switch, separately for D-, S- and M-modes.
There are three settings: Default, Enabled, and Disabled.
“Default” uses whatever is set in the flashed map.
“Enabled” and “Disabled” override the settings in the map.
Kickdown Disabled does NOT mean that the car won't downshift, but the extra downshift initiated through Kickdown will be suppressed.
| Note |
|---|
Please note that all functions related to Kickdown will be disabled as well, e.g. Max Performance Mode, etc. |
Throttle Blips in M-Mode
Throttle blips are used to adjust the engine speed during downshifts. This function allows you to set the aggressiveness of your downshift blips in manual mode.
The main aim of rev-matching is to speed up downshifts by actively matching the engine rpm to the target rpm in the target gear. This is achieved by applying a short blip to the throttle during the transition between 2 gears.
Users can change the intensity of this blip by +-50% compared to the setting in any of the OTS maps or custom maps used.
Higher values result in more audible and faster blips but can be uncomfortable.
Lower values will result in slower but smoother rev-matching.
| Info |
|---|
This feature does not support all vehicles/maps. Supported are Stage 3 maps and N54/N55 cars. |
Lockout 6th Gear in S-Mode
This has been a never-ending debate since the introduction of xHP Flashtool. Some users want the transmission to engage the 6th Gear at motorway speeds when using S mode, while others don't and complain about the same thing. Most BMWs do not use the 6th Gear in S mode. It's a factory setting and is due to the German Autobahn.
Nothing is more annoying than a transmission that shifts back and forth between 5th and 6th Gear at constant speeds of 200km/h+. On the other hand, customers in other countries use S-mode as standard and complain about poor motorway mileage.
Our OTS maps mostly use 6th Gear in S-mode, as most of our customer base cannot enjoy unlimited motorway driving. To end this battle, users can use this switch to disable 6th Gear in S-mode, although most of our OTS maps are configured differently.
Limiters
Valet-Mode
Lend your high-performance vehicle to your children safely, or make sure the garage mechanic does not show off your car to his mates. Valet Mode can be applied to any map and works safely in all driving environments.
Limits your vehicle's power to approximately 100 hp in lower gears and 130 hp in higher gears.
Limits max. RPM to approx. 2500-3000 (depending on vehicle)
Disables kick down
Prevents premature downshifting in manual mode (max. 2500 rpm)
Locks the transmission in its slowest operating mode
Disables launch control/brake boost.
Max. RPM
Allows users to set their own WOT (Wide Open/Full Throttle) shift points. "Max RPM can be set separately for D-, S- and M-modes.
These values are only used when the kickdown switch (the resistance at the end of the throttle travel) is not activated.
Torque Limit per Gear
Limiting torque in the lower gears, especially on high-performance RWD cars, can improve traction and make driving easier.
xHP offers a range from 300 Nm (221 ft-lbs.) to a maximum of 1000 Nm (737 ft-lbs.) for each Gear.
It can be used to limit boost in the lower gears or limit total engine power in all gears to protect powertrain components.
The electronic limiter requests the ECU (engine control unit) to reduce torque when the set limit is reached.
The ECU then takes the necessary measures (closing the throttle/lower boost/lower timing) to maintain this limit. The same method is used during shifting when the TCU (Transmission Control Unit) takes control of the torque produced by the engine to improve shifting.
This method of control works continuously and within fractions of a second.
We have also included presets for RWD, RWD with sticky tyres and AWD cars to get you started. Start with these settings and test how your car behaves in your environment. Based on your car's characteristics (weight, tyres, suspension, differential, etc.) and the roads you usually drive on, you can adjust the limits until you find the perfect match.
Miscellaneous
Gear Display
Allows the user to customise the “current Gear” display on the instrument panel.
Four settings are available:
“Default” uses whatever is set in the flashed map.
“OFF” switches the display off. The dash will only show the current mode, not the current Gear (except in M-mode).
Display Actual Gear and Display Target Gear show the current Gear in all modes (D, S and M) but differ in when the display changes to the next Gear.
"Display Actual Gear" causes the display to change when the shift has been fully processed and the next Gear has already been engaged by the transmission.
"Display Target Gear" switches the display at the beginning of the shift. Drivers have different perceptions of when it is correct for the gear display in the instrument panel to change.
This allows the user to choose their preferred option.
If there is an error displaying the current Gear, please refer to our FAQ.
Back to the Overview Page.